# Animation Handling
The Assistant can manage your Aseprite files, and automatically convert them to properly named and sized spritesheets.
# Basic Usage
Make sure that aseprite_path is set correctly in assistant/assistant_config.yaml.
Put your Aseprite files in the anims directory. The assistant will make a matching sprite sheet in the sprites
directory whenever an animation changes.
For example an anims/bair.aseprite with 10 frames would create sprites/bair_strip10.png.
Danger!
Files in the anims directory will overwrite matching files in the sprites directory.
Do not work directly on a spritesheet if you have a matching Aseprite file in anims.
Note that the Assistant lives inside the GMEdit or VSCode plugin. It will only see your Aseprite file changes if the project is open in the editor with the plugin.
# Tag Integration
# Animation Tags
Some people keep multiple animations in a single Aseprite file, for convenience.
If an Aseprite file contains any blue tags (configurable), it will treat each blue-tagged section as a separate animation.
Instead of exporting the Aseprite file as a single spritesheet, each blue tag will create its own sprite sheet, named after the tag.
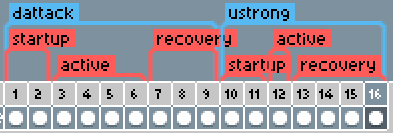
# Window Tags
If an animation matches the name of a script in your attacks folder, then the Asssistant will treat each red
-tagged (configurable)
section as a window of the attack.
The injector will then provide macros to that attack with the window's timing data.
For example, for a window called startup:
#macro STARTUP_FRAMES 3
#macro STARTUP_FRAME_START 1
By using those macros in your code rather than raw numbers, your script will automatically stay up to date when you add or remove frames from the animation.
# Hurtbox Generation
Manually create hurtboxes no more!
The Assistant can generate customized hurtboxes from your sprites, no matter your workflow.
Hurtboxes are automatically generated for any animation that normally gets one (e.g. bair). You can manually request a
hurtbox for an attack by starting the attack's name (in the file name or attack tag) with "HURTBOX". The HURTBOX label
will be removed from the actual attack name.
By default, the full silhouette of the sprite will be the hurtbox. If you have a basic animation with no weird effects or disjoints, you don't need to do anything at all.
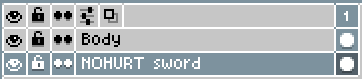
# NOHURT layer tagging
If you have different parts of your character on different layers, you can just add NOHURT
to the beginning of the layer name, and the Assistant will exclude that layer from hurtbox generation.
It's also possible to put NOHURT under layer properties -> user data, but this could make it hard to tell which layers you have marked for exclusion.
# The HURTMASK Layer
You can still use hurtbox generation if you're not so organized.
If you have a layer named HURTMASK, its silhouette will be subtracted from the hurtbox. Scribble over the parts
that shouldn't be in the hurtbox.
This layer won't show up in your animation. It's only used to edit the hurtbox.
# The HURTBOX Layer
The only thing missing is if for some reason your hurtbox is larger than your sprite. This sounds like something to avoid.
If you have a layer name HURTBOX, the Assistant adds its silhouette to the hurtbox.
Again, this layer won't show up in your animation. It only adds to the hurtbox.